
One of the most important concepts in cybersecurity is access control. When we talk about access control, user management is really important. This is because all of the permissions and access are given to a user or a group. In Linux, we can have multiple users and groups, and if we don’t know how to manage them properly, it can become a serious security concern.
In this part of the series, we are going to see how you can manage users in Linux effectively. We will see the most important commands of user management in Linux.
What is a User in Linux?
Before getting into user management, you must know what a user actually means on different system levels. Yes, what I mean to say is, the term “user” varies with the system levels.
1. The Kernel View: A User is Just a Number
When we talk about the raw hardware, the Kernel manages it. For the Kernel, a user is just a User ID, a number attached to a file. It doesn’t know anything about the user’s name.
To the kernel, a user is just a User ID (UID).
- Root is simply UID 0.
- You are likely UID 1000.
When you open up a file, the Kernel simply just checks if the User ID of the process trying to open the file matches the User ID of the file owner. If the number matches, the related permissions are given.
2. The System View: Text in a Config File
Now the question arises: if the Kernel only knows about UIDs and doesn’t care about names, where do the names come from?
These names come from a database. Don’t worry, it is a simple database that maps numbers to names. This database is a simple text file stored in the /etc directory.
Yes, the conversion of a name to number comes from the /etc/passwd file.
A “user” in Linux is literally just one line of text in this file. It looks like this:
krishna:x:1000:1000:Krishna Noutiyal...:/home/krishna:/bin/bashLet’s discuss the structure of this user:
krishna: The Username (for humans).x: Placeholder for the password (stored securely inshadowfile).1000: The UID (The real user identity).1000: The Primary Group ID (GID).Krishna...: The Comment (GECOS field)./home/krishna: The directory mapped to this user./bin/bash: The program that starts when this user logs in.
3. The Credentials: The shadow File
If the /etc/passwd file defines who the user is, then the /etc/shadow file defines how they prove it.
The file contains the encrypted hash of your password. If you delete a line in the password file, the user ceases to exist. If you delete the line in the shadow file, the user exists, but they cannot log in at all.
Absolutely. If /etc/passwd is the public directory of employees, /etc/shadow is the safe where the keys are kept.
This file is only readable by the root user (and the shadow group). This is because it contains the encrypted passwords. If a regular user could read this file, they could copy the hashes and try to crack them offline.
Here is the anatomy of a line in /etc/shadow.
The Example Entry
Let’s look at a typical entry for a user named krishna.
Plaintext
krishna:$y$j9T$SaltString$HashString...:19730:0:90:7:14:20000:
Note: The actual hash is much longer, I’ve shortened it for clarity.
There are 9 fields separated by colons (:). Here is what each one means:
The Breakdown of /etc/shadow
- Username (
krishna) The login name. It must match the entry in/etc/passwd. - Encrypted Password (
$y$j9T$...) This is the most critical field. It holds the hashed password.- Format: Usually
$id$salt$encrypted. $id: Tells the system which algorithm was used (e.g.,$6$is SHA-512,$y$is often yescrypt in newer distros like Kali).$salt: A random string added to your password before hashing to prevent Rainbow Table attacks.- Special Values:
*or!: The account is locked (cannot log in with a password).!!: Password has never been set.
- Format: Usually
- Last Password Change (
19730) This isn’t a date like “2024-01-08”. It is the number of days since January 1, 1970 (The Unix Epoch) that the password was last changed.- Why? It makes calculating “days until expiry” purely mathematical.
- Minimum Days (
0) The minimum number of days required before the user is allowed to change their password again.- 0 means they can change it whenever they want.
- Maximum Days (
90) The maximum number of days the password is valid. After this many days, the user is forced to change it.- 99999 is the default (basically “forever”).
- Warning Period (
7) The number of days before the password expires that the user will start seeing a warning message upon login (“Your password will expire in X days”). - Inactive Period (
14) If the password expires and the user still doesn’t change it, this is the “grace period” (in days). After this period, the account is completely disabled. - Expiration Date (
20000) An absolute date (again, in days since Jan 1, 1970) when the account will be disabled, regardless of password age. Used for temporary contract workers. - Reserved (
| Field | Value Example | Meaning |
| User | krishna | Login Name |
| Password | $6$xyz... | The Hash (Target for cracking) |
| Last Change | 19730 | Days since Jan 1, 1970 |
| Min Days | 0 | Can change immediately |
| Max Days | 90 | Must change every 3 months |
| Warn Days | 7 | Warn 1 week before expiry |
| Inactive | 14 | Grace period after expiry |
| Expire | 20000 | Account death date |
| Reserved | (empty) | Future use |
Types of Users in Linux
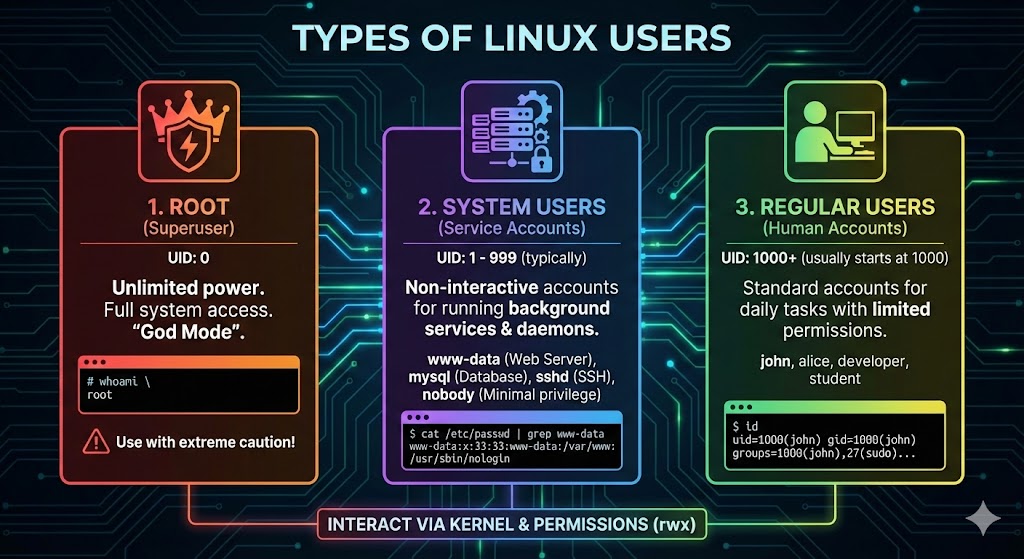
The Main Users of Linux
Multiple users can login and operate simultaneously on Linux operating system. You have a single user that you know e.g. krishna , There are various users that are running in the background doing their tasks. All of this happens without you even noticing it.
You can see the entries in the /etc/passwd file, There are various users that you don’t even know but exist in your Linux OS. In Linux, the users are broadly classified into three types:
- Root: The superuser of your operating system, having the most privileges.
- System Users: Background users that perform specific tasks. These users can’t log in and are present just for the sake of access control.
- Regular Users: The normal users that you log in with, e.g.
krishna.
A Broader Classification of Linux Users
When looking deeper in the Linux operating system you can classify the users into some more categories. These are:
| User Type | Typical UID | Login Shell | Description | Common Examples | Hacker’s Perspective |
| Root (Superuser) | 0 | /bin/bash | The absolute administrator. Has unrestricted access to every file, command, and process. The kernel allows UID 0 to do anything. | root | The Final Goal. Owning root means you have full control over the machine. |
| Pseudo-Users | 1 – 9 | /sbin/nologin or /bin/false | Legacy system accounts that own core OS files (binaries, man pages). They exist for file ownership structure, not for running services. | bin, daemon, sys | Rarely targeted directly. They are artifacts of how Linux organizes system files. |
| System Users (Service Accounts) | 10 – 999 | /usr/sbin/nologin or /bin/false | Non-human accounts created to run specific background applications (daemons). They are restricted to only the files their specific service needs. | www-data (Web), mysql (DB), sshd, postfix | The Entry Point. Hackers often land here first by exploiting a vulnerability in a web app or service. |
| Sudoers (Admin Users) | 1000+ | /bin/bash | Regular users who have been granted special privileges in /etc/sudoers. They can execute commands as root by typing sudo. | sysadmin, ubuntu, kali | The Golden Ticket. If you compromise this user, you can become root easily (sudo su). Check with sudo -l. |
| Regular Users | 1000+ | /bin/bash | Standard human accounts for daily tasks. Restricted to their home directory (/home/user) and public files. Cannot modify system configs. | john, alice, student | The Pivot. A standard foothold. You compromise this user and then search for misconfigurations to escalate privileges. |
| Guest Users | Variable | /bin/rbash (Restricted) | Temporary accounts with severely limited shells. They often cannot change directories or run most commands. | guest, visitor | The Sandbox. A very difficult environment to work from. You usually need to “break out” of the restricted shell first. |
| Nobody User | 65534 | /usr/sbin/nologin | The generic “least privileged” user. Used by the OS to run untrusted processes that should have no file access rights at all. | nobody | The Dead End. If you land here, you are in a deep hole. You have almost no permissions to read or write anything. |
What are Linux User IDs (UIDs)
There are various users in Linux, and all of them have their unique user id. But when we broadly classify the UID or User IDs, They are only there are only four types of UIDs.
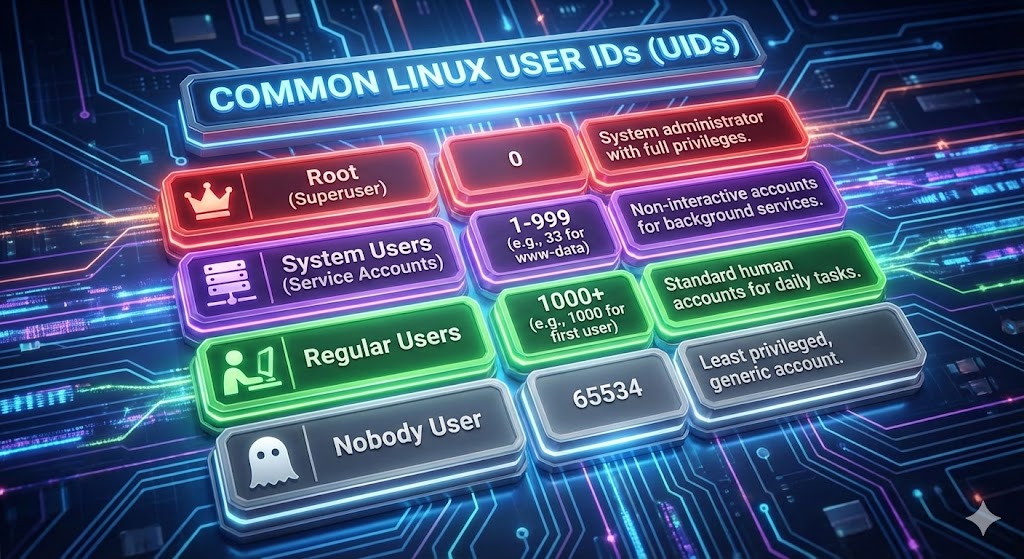
Here is a table of Linux user ids:
| UID Range | User Type | Description |
| 0 | Root | The Superuser. Hardcoded into the kernel. If you change a user’s UID to 0, they become root. |
| 1 – 999 | System Users | Reserved for background processes and daemons (Apache, MySQL, SSH). They usually have no login shell. (Note: On some older systems, this range is 1-499) |
| 1000+ | Regular Users | The range for human beings. The first user created (you) gets 1000, the next 1001, and so on. |
| 1000+ | Sudoers | Important: Sudoers do not have a special UID range. They are just Regular Users (e.g., UID 1000) who are added to the sudo group. |
| 65534 | Nobody | The traditional UID for the nobody user. It is often the highest possible UID on older 16-bit systems ($2^{16}-2$). |
User Groups in Linux
In Linux, whenever a new user is created, a respective group of that user is also created with the same name as the user itself. But a user in Linux can have multiple groups, and if you don’t want that, you can also change the primary group of the user which was assigned to them when created.
Primary Group
- Every Linux user has a primary group.
- By default, this group has the same name as the user.
- The group id for this group is the same as the user id
- There can only be one primary group for a user.
Secondary Group
- A user can have multiple secondary groups
- This helps in access control at a large scale
- With multiple groups assigned to a single user, A user can enjoy multiple privileges at once
User Management Commands
In Linux, user management is not a simple thing. There are various commands that you need to know and master to fully manage your environment. I will go through each of the commands that are really important for you in Linux for user management.
1. useradd: The Birth of an Identity
The useradd command is how you introduce a new entity to the system. You might have seen adduser used in tutorials. adduser is a friendly script that asks you nice questions. We don’t want nice. We want precision. useradd is the low-level utility that does exactly what you tell it to, making it perfect for scripting or stealthy account creation.
The Syntax: useradd [flags] username
Let’s look at the flags that actually matter for security.
The Flags You Need to Know:
-m(Make Home): Creates the user’s home directory (usually/home/username). If you are creating a backdoor user to hide in the system, you might skip this to be less conspicuous. No home, no clutter.-s(Shell): Defines the login shell.- Hacker Note: If you see
/bin/bashor/bin/zsh, that user can log in and run commands. If you see/bin/falseor/usr/sbin/nologin, that’s usually a service account that shouldn’t have interactive access.
- Hacker Note: If you see
-u(UID): Sets the User ID manually.- Critical: Remember, root is UID 0. If you can create a user with
-u 0, you have just created a second root account.
- Critical: Remember, root is UID 0. If you can create a user with
-g(Primary Group): The main group the user belongs to.-G(Secondary Groups): Additional groups. This is often where privileges live (like thesudogroup).-c(Comment): A text field for the user’s full name or info.-e(Expire Date): The date the account will automatically disable (YYYY-MM-DD).-f(Inactive Days): The number of days after a password expires before the account is permanently disabled.
Practical Example: The “Junior Pentester”
Let’s create a user named cyber_test. We want them to have a home directory, use the Bash shell, and we want to leave a comment saying who they are.
Bash
sudo useradd -m -s /bin/bash -c "Junior Pentester" cyber_test
If you check the /etc/passwd file now, you’ll see a new line at the bottom representing this user. Badhai ho, you’ve just created life (digitally speaking).
2. passwd: Keys to the Kingdom
A user without a password (in most configurations) is like a house with no door handle—you can’t get in. You need a key.
The Command:
Bash
sudo passwd cyber_test
It will prompt you to type the new password twice. Linux won’t show the asterisks **** while you type—it’s a security feature, not a bug, so don’t panic if the screen looks frozen.
Hacker Tip: Locking an Account Sometimes, you don’t want to delete a user, but you want to ensure they can’t log in. Maybe you suspect an account is compromised. You can lock it.
Bash
sudo passwd -l cyber_test<br>This puts a ! in front of the password hash in the /etc/shadow file. The system sees that ! and immediately rejects any password provided. It’s a simple, effective kill switch.
3. usermod: Changing the Narrative
People change. Roles change. Sometimes you need to upgrade a standard user to an admin, or “root” a box by modifying your current user. The usermod command modifies an existing user account.
The flags are almost identical to useradd, which makes them easy to remember, but there is one massive trap you need to avoid.
The “Append” Trap (-G vs -aG)
This is where beginners break things.
If you want to add a user to a new group (like sudo), you usually use -G. But if you only use -G, Linux says, “Okay, set the groups to exactly this.” It effectively removes the user from all their other groups.
I’ve locked myself out of servers by doing this. Mat karna ye galti.
Always use -a (append) with -G.
Practical Example: The Promotion
Let’s say cyber_test has been promoted. We need to add them to the sudo group (giving them admin rights) and change their comment.
Bash
# -a for Append, -G for Group
sudo usermod -aG sudo -c "Senior Pentester" cyber_test
Now, let’s say we want to change their login name entirely from cyber_test to hacker_pro.
Bash
# -l changes the Login name
sudo usermod -l hacker_pro cyber_test
4. chage: The Time Bomb
This command handles Password Aging. It’s often ignored by beginners, but in enterprise environments (and hardened systems), this is what forces you to change your password every 90 days.
For a hacker, checking chage on a compromised user tells you how long you have before your password expires and you lose access. It’s essentially a timer ticking down on your persistence.
The Flags:
-l(List): Lists the current aging policy for a user. Always run this first.-E(Expire Date): Set a hard date for the account to die.-d(Last Day): Sets the date the password was last changed.- Trick: If you set this to
0, the system thinks the password has never been changed and will force the user to change it immediately upon next login.
- Trick: If you set this to
-M(Max Days): Max days before a password must be changed.-W(Warning Days): Days of warning before expiry.
Practical Example: The Contract Worker
Let’s see the status of our user:
Bash
sudo chage -l hacker_pro
Now, let’s imagine hacker_pro is a temporary contractor. We want to force them to change their password the first time they log in, and we want the account to automatically self-destruct on December 31st.
Bash
# -d 0 forces password change on next login
# -E sets account expiration date
sudo chage -d 0 -E 2026-12-31 hacker_pro
5. userdel: Cleaning Up Tracks
When an employee leaves, or when a hacker wants to remove logs of their “test” user, we use userdel.
The One Flag to Rule Them All: If you just run userdel hacker_pro, the user entry is gone from /etc/passwd. But their home directory (/home/hacker_pro) and their mail spool remain on the disk. This is messy. It leaves “orphaned” files that are owned by a UID that no longer exists.
Use -r (remove) to delete the home directory and mail spool along with the user.
Bash
sudo userdel -r hacker_pro
Putting it all together: The Lab
Let’s do a quick exercise to connect this with our previous lesson on permissions. We will create a scenario where we have a user and a secret folder only they can touch.
Scenario: You are the admin. You need to create a user alice and give her a private directory for her research. Make sure the ls doesn’t have any other permissions. Alice should not have access to any other folders or files.
I want you to do this practical for yourself because it is going to make things more clear.
Step 1: Create the User
Bash
# Create alice with a home directory
sudo useradd -m -s /bin/bash alice

# Give her a password
sudo passwd alice
Step 2: Create the Secret Folder We’ll make a directory in /opt.
Bash
sudo mkdir /opt/alice_secrets
Step 3: Lock it Down Right now, root owns that folder. We need to give it to Alice.
Bash
sudo chown alice:alice /opt/alice_secrets
Step 4: Set Permissions Now, let’s use what we learned in the last article. We want Alice to have full access (7), and nobody else to have any access (0).
Bash
sudo chmod 700 /opt/alice_secrets
Step 5: The Test Now, try to switch to a different user (or stay as your current user) and try to enter that folder.
Bash
cd /opt/alice_secrets
You should get a
Permission deniederror. Only Alice (and Root) can enter.
FAQs
Q: What is the difference between useradd and adduser? useradd is a low-level native command that requires you to specify flags (like home directory creation) manually. adduser is a high-level Perl script (on Debian/Ubuntu systems) that is interactive and sets up home directories, shell, and prompts for a password automatically. For scripting and precision, use useradd. For quick manual creation, adduser is fine.+1
Q: Where are the users actually stored in Linux? Users aren’t stored in a database in the traditional sense. They are defined in text files:
/etc/passwd: User info (username, UID, GID, shell, home dir)./etc/shadow: Encrypted passwords and ageing info./etc/group: Group information.
Q: How do I check which groups I belong to?
Simply type the groups command in your terminal. It will list all groups for the current user.
Q: Can I have a user with no password?
Yes, but it’s a security risk. You can create a user with an empty password field, but most SSH configurations and PAM (Pluggable Authentication Modules) policies will reject logins from accounts with empty passwords by default.
Q: What happens if I delete a user but forget the -r flag?
The user entry is removed from the system files, but their files in /home/username stay on the disk. These files effectively become “orphaned”—they are owned by a UID that no longer maps to a username.
Q: What is user management?
User management is the process of creating, maintaining, and securing digital identities on a system. Since the Linux kernel only understands numbers (User IDs or UIDs), user management effectively maps human usernames to these UIDs to control access permissions and define who can do what on the server.
Q: What are the three types of users in Linux?
- Root (UID 0): The superuser with unlimited access to everything.
- System Users (UID 1–999): Non-human accounts used to run background services (like Apache or MySQL) securely.
- Regular Users (UID 1000+): Standard accounts for humans to perform daily tasks with limited permissions.
Q: What command is used to manage user accounts in Linux?
There isn’t a single command, but rather a core suite of five tools:
useradd: Creates a new user.usermod: Modifies an existing user (e.g., adding them to a group).userdel: Deletes a user.passwd: Sets or changes the password.chage: Manages account expiration and password aging.