
The Linux filesystem might seem complex at first, but fear not! Today we are going to cover most of the things and I will make sure you understand every bit of it. We’ll dive into the different directories, understand special features, and explore commands with practical examples, so you can understand it the practical way 😄
A Guided Tour of Directories
Imagine your computer’s storage as a well-organized office building. The Linux filesystem acts as the directory structure, with each directory being a specific department. Let’s explore some key ones and see how to list their contents:
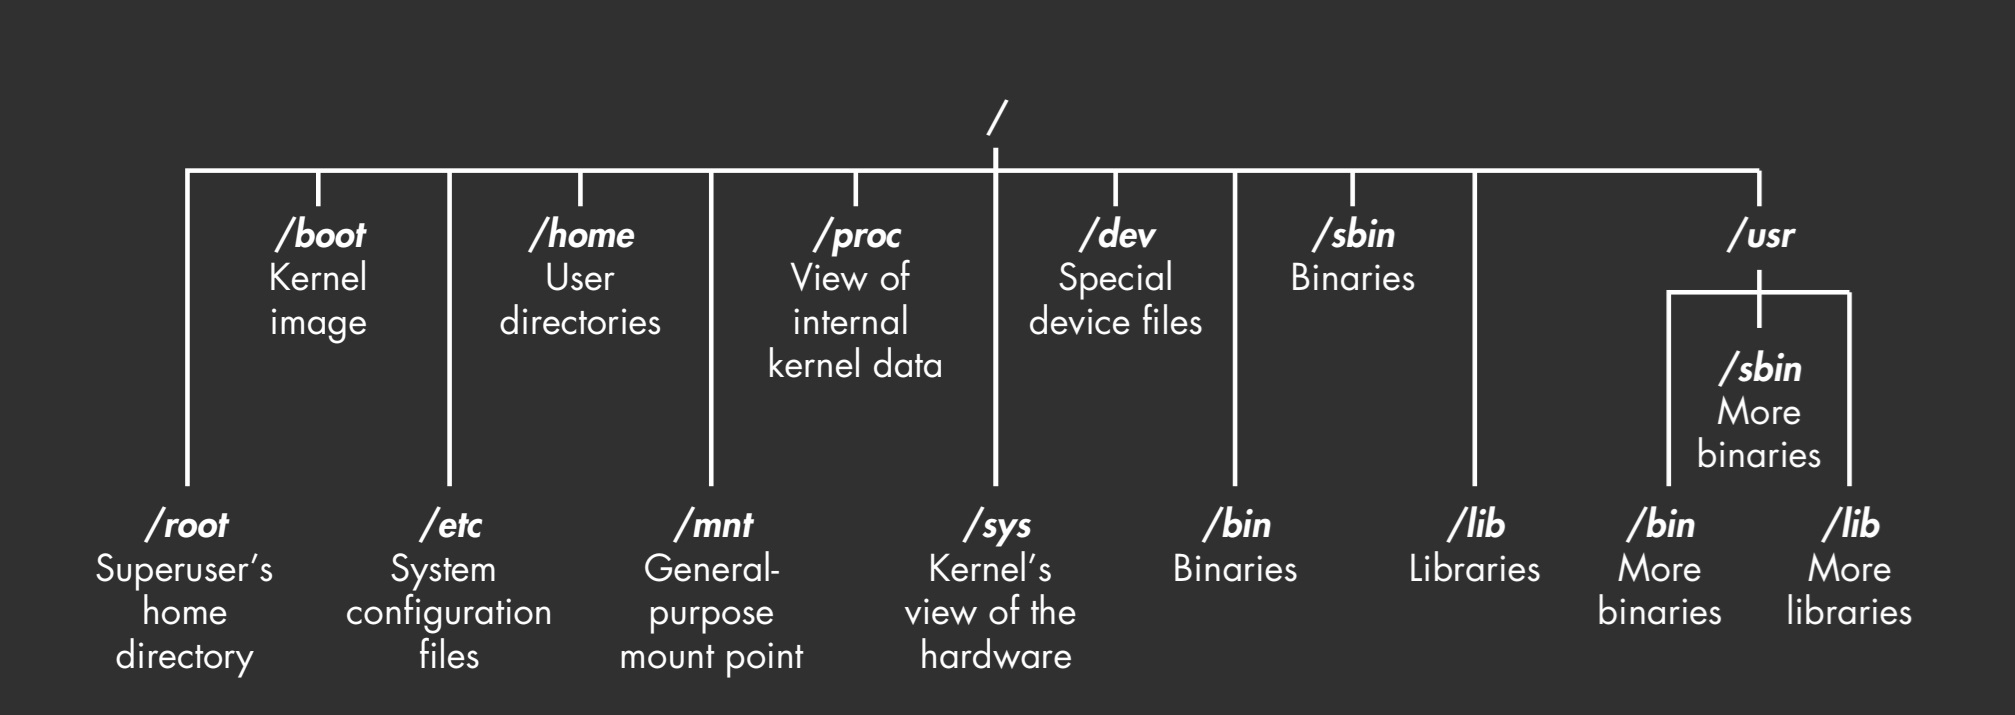
- / (Root Directory): This is the top floor, the central hub from where everything else branches out.
- Command:
ls /(This lists all the directories and files directly within the root directory)
- Command:
- /home: This is your personal workspace.
- Command:
ls /home(This lists all the user directories within /home)
- Command:
- /bin: This directory stores commonly used programs.
- Command:
ls /bin(This will show you essential tools likecp(copy),mv(move), andls(list) itself)
- Command:
- /etc: This area holds configuration files.
- Command:
ls /etc(Caution: Modifying files here can affect system behavior. It’s best to avoid this unless you’re comfortable.)
- Command:
- /var: This directory stores variable data.
- Command:
ls /var(This might show directories likelog(system logs) andwww(web server data, if applicable)
- Command:
There are many more directories, each with a specific purpose. As you explore Linux, you’ll discover these departments and how they work together to make your system function efficiently.
The Root User: Admin Access Explained
Just like an office has a CEO, Linux has the root user. This account has complete control over the system. Use the sudo command for administrative tasks, but remember, with great power comes great responsibility!
sudo su ( logs you into the root user account )

sudo commands ( runs any command with root access )

Example -

  sudo ls -l -a /home/Krish/Desktop
Everything’s a File
One of the core principles of Linux is that everything is treated as a file, even devices! For example, the /dev directory holds files that represent physical devices.
- Command:
ls /dev(You’ll see files likesda(hard drive),tty(terminals), andlp(printers))
┌──(hackbook㉿Beast)-[~]
└─$ ls -l /dev
total 0
crw-r--r-- 1 root root  10, 235 May  4 20:46 autofs
drwxr-xr-x 2 root root       40 May  4 20:46 block
drwxr-xr-x 2 root root      100 May  4 20:46 bsg
crw------- 1 root root  10, 234 May  4 20:46 btrfs-control
drwxr-xr-x 3 root root       60 May  4 20:46 bus
...
...
...
crw-rw-rw- 1 root root   1,   8 May  4 20:46 random
crw------- 1 root root 251,   0 May  4 20:46 rtc0
brw------- 1 root root   8,   0 May  4 20:46 sda  #Hardisk 1
brw------- 1 root root   8,  16 May  4 20:46 sdb  #Hardisk 2
brw------- 1 root root   8,  32 May  4 20:46 sdc  #Hardisk 3
drwxrwxrwt 2 root root       40 May  4 20:46 shm
lrwxrwxrwx 1 root root       15 May  4 20:46 stderr -> /proc/self/fd/2
lrwxrwxrwx 1 root root       15 May  4 20:46 stdin -> /proc/self/fd/0
lrwxrwxrwx 1 root root       15 May  4 20:46 stdout -> /proc/self/fd/1
crw-rw-rw- 1 root root   5,   0 May  4 20:46 tty
crw------- 1 root root   4,   0 May  4 20:46 tty0
crw------- 1 root root   4,   1 May  4 20:46 tty1
...
...
...
crw-rw-rw- 1 root root   1,   5 May  4 20:46 zero
Understanding Your Drive: The fdisk Command (Caution: Use with care!)
Imagine dividing your office building into separate workspaces. Similarly, you can partition your hard drive using the fdisk command. This powerful tool lets you create separate sections, but proceed with caution as mistakes can lead to data loss.
┌──(root㉿krish)-[/home/krish]
└─# fdisk -l
Disk /dev/nvme0n1: 60 GiB, 64424509440 bytes, 125829120 sectors
Disk model: VMware Virtual NVMe Disk
Units: sectors of 1 * 512 = 512 bytes
Sector size (logical/physical): 512 bytes / 512 bytes
I/O size (minimum/optimal): 512 bytes / 512 bytes
Disklabel type: gpt
Disk identifier: 681EFD6D-0A2E-4B09-A69A-BBEEBF324E1C

Device            Start       End  Sectors  Size Type
/dev/nvme0n1p1     2048    411647   409600  200M EFI System
/dev/nvme0n1p2   411648    673791   262144  128M Microsoft reserved
/dev/nvme0n1p3   673792  59267541 58593750 27.9G Microsoft basic data
/dev/nvme0n1p4 59269120  67080191  7811072  3.7G Linux swap
/dev/nvme0n1p5 67080192  67471359   391168  191M EFI System
/dev/nvme0n1p6 67471360 125827071 58355712 27.8G Linux filesystem


Disk /dev/sda: 60 GiB, 64424509440 bytes, 125829120 sectors
Disk model: VMware Virtual S
Units: sectors of 1 * 512 = 512 bytes
Sector size (logical/physical): 512 bytes / 512 bytes
I/O size (minimum/optimal): 512 bytes / 512 bytes
Disklabel type: gpt
Disk identifier: F9B32768-87D6-47F1-8AA0-58E9D89415A0

Device        Start       End  Sectors  Size Type
/dev/sda1        34     32767    32734   16M Microsoft reserved
/dev/sda2     32768  64385023 64352256 30.7G Microsoft basic data
/dev/sda3  64385024 125825023 61440000 29.3G Microsoft basic data
The Kernel
The kernel is the heart of Linux, the central program that acts as a bridge between your hardware and software. You won’t directly interact with the kernel, but it’s the unsung hero behind everything that happens. Just to give you an Idea of what kernel does, here is a small list of its working:
- Hardware Management: The kernel controls access to physical components like your hard drive, CPU, and memory. It allocates resources and ensures smooth communication between hardware and software.
- Memory Management: The kernel keeps track of used and available memory, ensuring applications get what they need to run. It also handles virtual memory, creating the illusion of more RAM than physically present.
- Process Management: The kernel decides which programs can run, allocates CPU time, and prioritizes tasks. It ensures processes don’t interfere with each other and handles multitasking efficiently.
- Device Drivers: The kernel acts as a translator between hardware and software applications. Device drivers, loaded by the kernel, provide the specific instructions for the system to interact with different devices.
- Security: The kernel enforces security measures, controlling access to system resources and protecting against unauthorized modifications.
Mounting and Unmounting
The mount and umount commands are essential tools in Linux for managing access to storage devices like partitions, external drives, and even remote filesystems. So let us see how they work and explore different flags to customize their behaviour.
Mounting: Making Storage Accessible
The mount command attaches a storage device to the existing filesystem hierarchy, making its contents accessible. Here’s the basic syntax:
Syntex :

  sudo mount /dev/device /mountpoint

Example :

sudo mount /dev/sdb /media/usb # Mounting my usb to /media/usb- /dev/device: This represents the physical device or partition. Use
lsblkto list available devices. - /mountpoint: This is the directory where the mounted device’s content will be visible. You can create this directory beforehand using
mkdir.
I have already taught you that everything is a file in the Linux and /dev directory that contains the files representing physical devices eg. hardisk, SSD, NVMe, USB etc.
Above I used the sudo to give it root privileges while running the mount command and the first argument is /dev/sdb, that is the file representing my 32 GB USB ( Watch the video to understand why /dev/sdb is the file representing my USB 😄 ) and the second argument is the mount point. The mount point can be any folder present in the Linux file system but by default mnt and media folders present in the root directory are used for mounting.
Exploring Mount Flags:
- -t filesystem_type: Specify the filesystem type (e.g., ext4, NTFS). By default,
mounttries to detect it automatically. - -o options: This allows you to configure various mount options:
- -o ro: Mount the device read-only (prevents data modification).
- -o rw (default): Mount the device read-write (allows both reading and writing).
- -o noexec: Disables program execution from the mounted device (for security reasons).
- -o auto: Automatically mount the device at system boot (often used in
/etc/fstab).
Example:
sudo mount -t ext4 /dev/sda1 /mnt/mydrive -o rw,noexec
This mounts the first partition (/dev/sda1) of your first hard drive (sda) to the /mnt/mydrive directory in read-write mode with program execution disabled.
Unmounting: Safely Detaching Storage
The umount command detaches a mounted device, making it unavailable until mounted again. Use it with caution to avoid data corruption, especially on actively used devices.
Syntax :

  sudo umount /mountpoint

Example :

  sudo umount /media/usb
In the example above, I have unmounted the 32GB device which I previously mounted to my Kali Linux workstation.
Unmount Flags:
- -l: Safely unmount even if the device is busy (attempts to close any open files).
- -f: Force unmount (use with caution, as it can lead to data loss).
Example:
sudo umount -l /mnt/mydrive
This safely unmounts the previously mounted /mnt/mydrive directory.
Remember: Always unmount a device before physically removing it to avoid data inconsistency.
Exploring Your Drives: The lsblk Command
The lsblk stands for List Block Devices and provides detailed information about your hard drives, partitions, and any other connected storage.
┌──(krish㉿krish)-[~]
└─$ lsblk
NAME        MAJ:MIN RM  SIZE RO TYPE MOUNTPOINTS
sda           8:0    0   60G  0 disk
├─sda1        8:1    0   16M  0 part
├─sda2        8:2    0 30.7G  0 part
└─sda3        8:3    0 29.3G  0 part
sr0          11:0    1 1024M  0 rom
nvme0n1     259:0    0   60G  0 disk
├─nvme0n1p1 259:1    0  200M  0 part /boot/efi
├─nvme0n1p2 259:2    0  128M  0 part
├─nvme0n1p3 259:3    0 27.9G  0 part
├─nvme0n1p4 259:4    0  3.7G  0 part [SWAP]
├─nvme0n1p5 259:5    0  191M  0 part
└─nvme0n1p6 259:6    0 27.8G  0 part /
There are many other things that you can do with this command, and if you use linux frequently one day or another you will use this for checking disk partitions connected block devices etc. So below are the list of some important flags used with lsblk . I want you to try it yourself and see what is the size of your ROM in bytes
Understanding the Flags:
- -a: This flag shows all block devices, even those that are not currently mounted. This is useful for getting a complete picture of your storage landscape.
- -b: This flag displays the size of the devices in bytes instead of the human-readable format (e.g., GB, TB). Useful for precise calculations.
- -f: This flag shows the filesystem type for each device (e.g., ext4, NTFS).
- -l: This flag provides a more detailed output, including additional information like the model name of the device (for disks) and the UUID (Universally Unique Identifier).
- -o, –output [OPTIONS]: This flag allows you to specify a comma-separated list of specific columns you want to see in the output. Here are some common options:
- NAME: Device name (default)
- SIZE: Device size
- TYPE: Device type (disk or partition)
- FSTYPE: Filesystem type
- MOUNTPOINT: Mount point (if applicable)
- LABEL: Device label (if available)
- RM: Removable device (yes/no)
WTF is sda,sdb, hda, nvme0n1 …
In Linux, disks are represented by device names such as sda, sdb, hda, nvme0n1 etc.
The sdX and hdX type
We will look into the sda, sdb, hda, hdb type devices first because they share similar naming conventions 😄
The letters in these names indicate the device type:
sd: SATA or SCSI/SATA driveshd: IDE (older) drives
The third letter corresponds to the device order (e.g., a for the first drive, b for the second drive, and so on).
For example:
/dev/sda refers to the first SATA drive.
/dev/hdb refers to the second IDE drive.
Partition Naming
You’ll encounter names like sda1, sda2, sdb1, etc. Now, So its really important you know what they are mean right ?
/dev/sda1represents the first partition on the first SATA drive./dev/sdb3represents the third partition on the second SATA drive.
Now that you know about the sdX and hdX type its time for the NVMe devices
The nvmenXpY type
nvme0n1: Thenvmeprefix indicates that this is an NVMe drive. This0refers to the first NVMe drive (if you had multiple, it would benvme1,nvme2, etc.).- The
n1part refers to the namespace associated with the drive. In most cases, there’s only one namespace (so it’s often justn1). - The
p2part refers to the partition number. In this case,nvme0n1p2is the second partition on the NVMe drive.
Remember these conventions when working with multiple operating systems on the same machine or dealing with unmounted drives. Knowing the device and partition names helps you manage your storage effectively! 😊.